Page History
...
| Add_workflow_for_techpubs | ||||||||||||
|---|---|---|---|---|---|---|---|---|---|---|---|---|
|
| Excerpt Include | ||||||
|---|---|---|---|---|---|---|
|
...
| Warning | ||
|---|---|---|
| ||
You must follow these steps completely and in the order shown. Failure to do so increases the risk of node failure. |
| Info | ||
|---|---|---|
| ||
Microsoft's Windows Update and Cloud Connector Edition update can be triggered by Microsoft from Office 365. The CCE will not be functional until Windows Updates completes the download and installation.. Windows Update could also restart the ASM. If no calls can be established (typically the failure is between CCE and O365) but the relevant Signaling Group is up, the following two issues can be expected:
In some instances, an ASM being updated has also closed the SIP Signaling Group. Technicians can manually stop and disable the Windows Update service, which will re-instantiate as a manual, running process after the ASM is restarted. |
| Panel | |
|---|---|
In this section...
|
Before You Start
...
| 0 | Table |
|---|---|
| 1 | Prerequisites |
...
| Spacevars | ||
|---|---|---|
|
...
An Office 365 tenant with an E5 license or E3 + Cloud PBX.
...
You must have the Skype for Business Administrator role for your O365 tenant account.
...
A public certificate authority ready to sign a certificate for the
| Spacevars | ||
|---|---|---|
|
| Warning | ||
|---|---|---|
| ||
Complete the steps outlined in Certificate Requirements at Microsoft Technet. |
...
A properly configured firewall. See Ports and Protocols at Microsoft Technet.
...
Latest System Release SBC Firmware.
| Warning | ||
|---|---|---|
| ||
|
Latest System Release SbcComms Firmware.
| Warning | ||
|---|---|---|
| ||
|
| Panel | ||||
|---|---|---|---|---|
In this section...
|
| Note |
|---|
SBC Edge supports new deployment with CCE 2.1.0 in Release 6.1.5. Before this release, if your CCE auto-updates to CCE 2.1.0:
|
| Info |
|---|
For details on troubleshooting, see Troubleshooting Cloud Connector 6.1.2. |
| Multiexcerpt include | ||||
|---|---|---|---|---|
|
Scenario 1 and Scenario 2 are covered in Configuring the SBC Edge for a Single CCE. This document contains steps for Scenario 3 and Scenario 4 .
| Multiexcerpt include | ||||
|---|---|---|---|---|
|
Network Settings
| Note |
|---|
We recommend deploying both Appliances on the same subnet with a resilient connection. |
For the purposes of this document, the CCE is deployed in the following network:
| Caption | ||||
|---|---|---|---|---|
| ||||
|

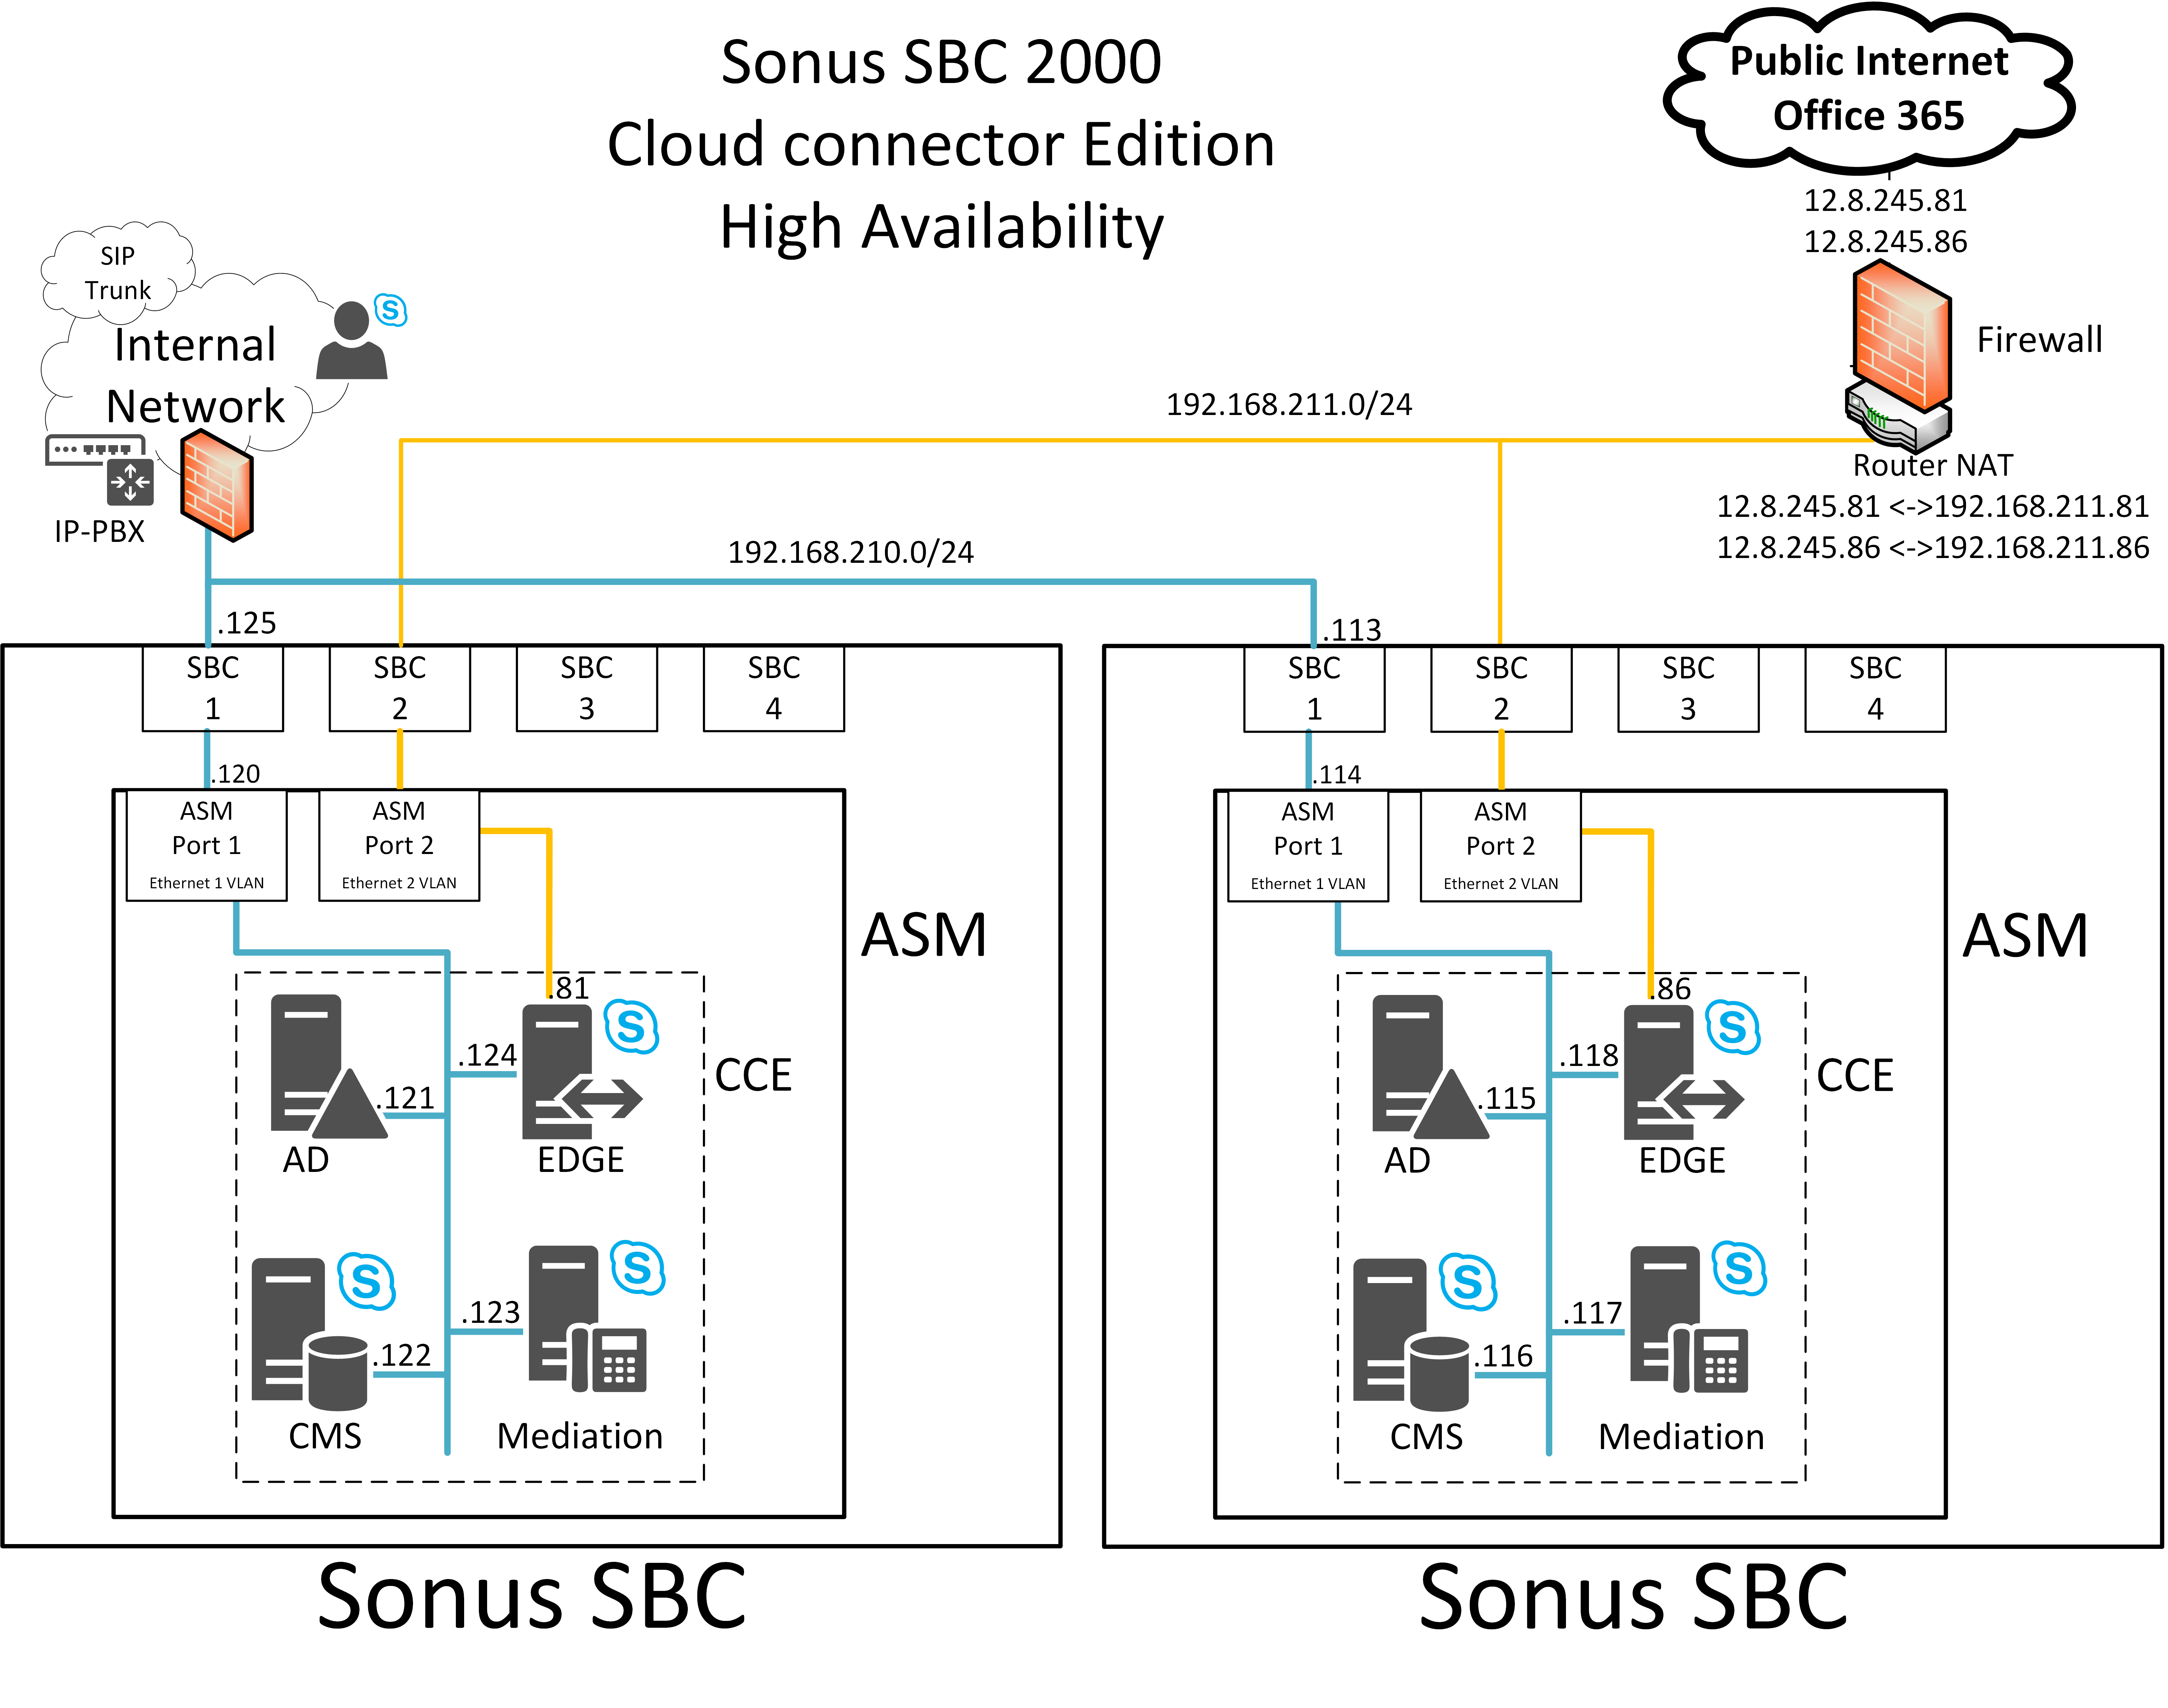
Firewall Settings
In this best practice the router/firewall is configured with the following rules:
| Caption | ||||||||||||||||||||
|---|---|---|---|---|---|---|---|---|---|---|---|---|---|---|---|---|---|---|---|---|
| ||||||||||||||||||||
|
| Caption | ||||||||||||||||||||||||||||||||||||||||||||||||||||
|---|---|---|---|---|---|---|---|---|---|---|---|---|---|---|---|---|---|---|---|---|---|---|---|---|---|---|---|---|---|---|---|---|---|---|---|---|---|---|---|---|---|---|---|---|---|---|---|---|---|---|---|---|
| ||||||||||||||||||||||||||||||||||||||||||||||||||||
|
| Caption | ||||||||||||||||
|---|---|---|---|---|---|---|---|---|---|---|---|---|---|---|---|---|
| ||||||||||||||||
|
| Multiexcerpt include | ||||
|---|---|---|---|---|
|
Preparing Your Node
Preparing the SBC Edge for Initial Setup
Update the SBC Edge firmware to the latest release version.
| Note |
|---|
|
Sonus recommends starting with a clean and empty configuration.
| Caption | ||||
|---|---|---|---|---|
| ||||
|


| Info | ||||||||
|---|---|---|---|---|---|---|---|---|
| ||||||||
When configuring a secondary
|
Preparing the ASM
If your ASM has been used previously, reinitialize it following the steps in Re-Initializing the ASM.
Confirm that the ASM is ready to deploy the CCE by following these steps.
| Note | ||||
|---|---|---|---|---|
Perform these steps on both
|
| Step | Action |
|---|---|
| 1 | Login to the WebUI of the SBC Edge. |
| 2 | Click the Task tab, and then click Operational Status. |
| 3 | Verify that:
|
| 4 | Change the ASM Admin password:
|
Deploying the CCE
Deploying the CCE on the
| Spacevars | ||
|---|---|---|
|
- Prepare the CCE deployment on the SBC Edge using the section below.
- Using Sonus Cloud Link Deployer via Remote Desktop on the ASM Module:
- Register all the CCE appliances.
- Install and publish the CCE Appliance Master.
- Install the CCE Appliance Slave.
| Note |
|---|
...
Microsoft Cloud Connector Edition image 1.4.1 on ASM recovery partition.
...
CCE Deployment Scenarios
The following diagram shows typical CCE deployment scenarios on a PSTN site. The PSTN site is a combination of Cloud Connector instances, deployed at the same location, and with common PSTN gateways pool connected to them. PSTN sites allow you to:
Provide connectivity to gateways closest to your users.
Allow for scalability by deploying multiple Cloud Connector instances within one or more PSTN sites.
Allow for high availability by deploying multiple instances of Cloud Connector within a single PSTN site.
| Caption | ||||
|---|---|---|---|---|
| ||||
|

Scenario 1 and Scenario 2 are covered in Configuring the SBC Edge for a Single CCE. This document contains steps for Scenario 3 and Scenario 4 .
Network Settings
For this best practice, the CCE is deployed in the following network:
| Caption | ||||
|---|---|---|---|---|
| ||||
|


Firewall Settings
In this best practice the router/firewall is configured with the following rules:
| Caption | ||||
|---|---|---|---|---|
| ||||
 |
DNS Settings
Make sure that CCE FQDN is resolving to the
| Spacevars | ||
|---|---|---|
|
| Warning |
|---|
The following sections describe a clean install of the CCE. If your environment has already deployed with CCE, and you are planning to re-deploy, it is necessary to clean up the site(s) that may already exists in O365. To do so, please follow the steps in CCE Re-Deployment Specific Steps in Re-initializing the ASM. |
Preparing Your Node
Initial Setup
| Tip |
|---|
For best results:
|
| Note |
|---|
During the initial setup, SBC Edge have to be configured with two IP interfaces, one for internal company network (corporate network), and the second one for DMZ network (Internet network) as shown below: |
| Caption | ||||
|---|---|---|---|---|
| ||||
|

| Caption | ||||
|---|---|---|---|---|
| ||||
|
| Info | ||||||||
|---|---|---|---|---|---|---|---|---|
| ||||||||
When configuring a secondary
|
Preparing the ASM
If your ASM has been used previously, reinitialize it following the steps in Re-Initializing the ASM.
Confirm that the ASM is ready to deploy the CCE by following these steps.
| Note | ||||
|---|---|---|---|---|
Perform these steps on both
|
| Step | Action | ||||
|---|---|---|---|---|---|
| 1 | Login to the WebUI of the
| ||||
| 2 | Click the Task tab, and then click Operational Status. | ||||
| 3 | Verify that:
| ||||
| 4 | Change the ASM Admin password:
|
Deploying the CCE
Deploying CCE 1.4.1 on the
| Spacevars | ||
|---|---|---|
|
...
| Spacevars | ||
|---|---|---|
|
...
| Spacevars | ||
|---|---|---|
|
...
...
|
...
Anchor Configuring the CCE Through the WebUI Configuring the CCE Through the WebUI
Configuring the CCE Through the WebUI
| Configuring the CCE Through the WebUI | |
| Configuring the CCE Through the WebUI |
...
| Step | Action | ||||
|---|---|---|---|---|---|
| 1 | Login to the WebUI of both
| ||||
| 2 | Navigate to Tasks > Setup Cloud Connector Edition. | ||||
| 3 | Click the ASM Config tab and configure/verify the Network and IP settings of your ASM as shown below. | ||||
| 4 | Click Apply. After receiving the activity status as successfully completed, click the Generate CSR tab. |
| Caption | ||||
|---|---|---|---|---|
| ||||
|


| Caption | ||||
|---|---|---|---|---|
| ||||
|

Generating the CSR
This process is required only if you don't have a public certificate for your deployment. If you already have a certificate, proceed to Import Certificate.
| Note | ||||
|---|---|---|---|---|
Perform these steps on only one of the
|
| Step | Action | ||||
|---|---|---|---|---|---|
| 1 | Login to the WebUI of one of the
| ||||
| 2 | Navigate to Tasks > Setup Cloud Connector Edition > Generate CSR. | ||||
| 3 | Generate the CSR as shown below with following information. Note: This example uses aepsite1.sonusms01.com and sip.sonusms01.com as common name and SAN To ensure creating a valid CSR for Cloud Connector Edition usage, please see the section "Certificate requirements" on https://technet.microsoft.com/en-us/library/mt605227.aspx . |
| Caption | ||||
|---|---|---|---|---|
| ||||
|

Importing Certificate/Keys
...
| Step | Action | ||||
|---|---|---|---|---|---|
| 1 | Login to the WebUI of both
| ||||
| 2 | Navigate to Tasks > Setup Cloud Connector Edition and then click the Import Certificate /Keys and Key tab. | ||||
| 3 | 5 | On SBC-1, click the Action drop-down list and select the appropriate option:
| |||
| 4 | Click OK. | ||||
|
On SBC-2 select the certificate action applicable. For example, use Import PKCS12 Certificate and Key toto import the pkcs certificate you exported on SBC-1, enter the password, select the relevant certificate file. | ||||
| 4 | Click OK. | ||||
| 5 |
|
| Anchor | ||||
|---|---|---|---|---|
|
...
| Note | ||||
|---|---|---|---|---|
Perform these steps on both
|
| Step | Action | ||||||||||||||
|---|---|---|---|---|---|---|---|---|---|---|---|---|---|---|---|
| 1 | Login to the WebUI of the
| ||||||||||||||
| 2 | Open the Tasks tab and click Setup Cloud Connector Edition in the navigation pane. | ||||||||||||||
| 3 | Click the Configure CCE tab. | ||||||||||||||
| 4 | Configure all necessary information and then click OK.
Note: Enterthe ASM's IP address in the HA Master IP Address field. The Slave uses the same root certification as the Master, and this location contains the shared folder that contains the Root CA of the Master. | ||||||||||||||
| 5 | After receiving the activity status as successfully completed, click the Prepare CCE tab to continue. |


| Warning |
|---|
...
Verifying and Updating the the CCE Configuration INI File
You must verify (and possibly correct) the CCE Configuration INI File after configuring the CCE.
| Info |
|---|
When deploying a High Availability (HA) systems, it is important to have Management IP Prefix unique on each HA system. For instance, if your HA Master CCE system has 192.168.213.x as the Management IP Prefix, you need to be sure to configure this attribute differently on HA Slave system. While doing this, also make sure that subnet that you are defining in this field does not conflict in your IP infrastructure. |
| Note | ||||||||
|---|---|---|---|---|---|---|---|---|
Perform these steps on both The CCE deployment internally sets the domain suffix as defined under VirtualMachineDomain attribute. Although your
In addition, when deploying a High Availability (HA) systems, it is important to have Management IP Prefix unique on each HA system. For instance, if your HA Master CCE system has 192.168.213.x as the Management IP Prefix, you need to be sure to configure this attribute differently on HA Slave system. While doing this, also make sure that subnet that you are defining in this field does not conflict in your IP infrastructure. |
| Note | ||||
|---|---|---|---|---|
Perform these steps on both
|
Follow these steps to verify and correct values in the CCE Configuration INI File.
| Note | ||||
|---|---|---|---|---|
Perform these steps on both
|
| Step | Action | ||||
|---|---|---|---|---|---|
| 1 | Login to the WebUI of the
| ||||
| 2 | Click the Configure CCE tab and then click Click to re-configure CCE application. | ||||
| 3 | Click OK on the popup dialog box. | ||||
| 4 | Click the Edit Raw Config button. | ||||
| 5 | Verify/correct the values in the CCE Configuration INI File and then click OK. |
...
| Note | ||||
|---|---|---|---|---|
Perform these steps on both
|
| Step | Action | ||||
|---|---|---|---|---|---|
| 1 | Login to the WebUI of both
| ||||
| 2 | Open the Tasks tab and click Setup Cloud Connector Edition in the navigation pane. | ||||
| 3 | Click the Prepare CCE tab. | ||||
| 4 | Click the Prepare CCE button, enter the password for Edge Server External Certificate, and then click OK. | ||||
| 5 | To complete the deployment, continue with Manually Configuring the CCE on the ASM. |
...
Manually deploying CCE on the ASM requires:
Registering the CCE Appliance
Installing the CCE Appliance
Registering the CCE Appliance
| Note | ||||
|---|---|---|---|---|
Perform these steps on only one of the
|
Step | Action | ||||
|---|---|---|---|---|---|
| 1 | Remote desktop to the ASM of the
| ||||
| 2 | Launch PowerShell. | ||||
| 3 | Execute the following commend for HA Master:
| ||||
| 4 | Enter the password(s) as prompted for the various users. | ||||
| 5 | When prompted for the online tenant administrator user name and password, make sure to enter this information correctly. If you make a mistake, refer to Manage Your Office 365 Tenant | ||||
| 6 | After successful execution, remote desktop to the ASM of the
| ||||
| 7 | Launch PowerShell. | ||||
| 8 | Execute the following commend for the HA Slave, and enter the appropriate password(s) when prompted:
|
Install-CcAppliance on the HA Master Node
...
Step
...
Action
systems. |
Follow these steps to verify and correct values in the CCE Configuration INI File.
| Step | Action |
|---|---|
| 1 | Login to the WebUI of each SBC Edge. |
| 2 | Click the Configure CCE tab and then click Click to re-configure CCE application. |
| 3 | Click OK on the popup dialog box. |
| 4 | Click the Raw (INI) Config drop-down list, and select an option:
|
| 5 | Verify/correct the values in the CCE Configuration INI File and then click OK. |
Preparing the CCE
| Anchor | ||||
|---|---|---|---|---|
|
| Note | ||||
|---|---|---|---|---|
Perform these steps on both
|
| Step | Action |
|---|---|
| 1 | Login to the WebUI of each SBC Edge. |
| 2 | Open the Tasks tab and click Setup Cloud Connector Edition in the navigation pane. |
| 3 | Click the Prepare CCE tab. |
| 4 | Click the Prepare CCE button. A confirmation will request you to enter the password again for the new password. Only the Tenant credentials are already existing. The same password should be used on all Appliances in the site. Click OK as shown below. |
| 5 | To complete the deployment, continue with Activating the CCE. |
| Info | ||
|---|---|---|
If you receive this error message:
...refer to Manually Loading the Root and Intermediate Certificates on the CCE |
Activating the CCE
This step stores the Microsoft product keys, and activates the CCE VM (which is not yet activated).
| Note | ||||
|---|---|---|---|---|
Perform these steps on both
|
| Info |
|---|
Each CCE requires four VMs; each Microsoft Product Key activates two VMs. |
| Step | Action |
|---|---|
| 1 | Login to the WebUI of each SBC Edge. |
| 2 | Open the Tasks tab and click Setup Cloud Connector Edition in the navigation pane. |
| 3 | Click the Activate CCE tab. |
| 4 | In Domain Controller and Central Management Store VM > Windows Product Key 1, enter the first Microsoft Product Key. To identify the Product Key, see Identify Microsoft Product Key. |
| 5 | In Under Mediation Server and Edge Server VM > Windows Product Key 2, enter the second Microsoft Product Key. To identify the Product Key, see Identify Microsoft Product Key. |
| 6 | Click Activate. |
| 7 | Access Tasks> Operational Status to verify Windows Activation. |
| 8 | To complete the deployment, continue with installing the Installing the CCE Appliance using Sonus Cloud Link Deployer. |
| Caption | ||||
|---|---|---|---|---|
| ||||
|

| Info | ||||||
|---|---|---|---|---|---|---|
| ||||||
|

| Info | ||||||
|---|---|---|---|---|---|---|
| ||||||
|
| Anchor | ||||
|---|---|---|---|---|
|
| Note | ||
|---|---|---|
| ||
If you plan to use a proxy on the ASM Host to reach Office 365, you must add the Management network (192.168.213.0) into the exclusion list and specify proxy settings per machine rather than per user. |
| Note | ||
|---|---|---|
| ||
|
Using Sonus Cloud Link Deployer via Remote Desktop on the ASM Module:
- Register all the CCE Appliance.
- Install and publish the CCE Appliance Master.
- Install the CCE Appliance Slave.
Registering the CCE Appliance
| Note |
|---|
Perform these steps on only one |
...
of the
|
...
Launch PowerShell.
...
Execute the following command for the HA Master, and enter the appropriate password(s) when prompted:
Install-CcAppliance
systems. |
Publish-CcAppliance
Step | Action | ||||
|---|---|---|---|---|---|
| 1 | Remote desktop to the ASM of the
SBC Edge System 1. | ||||
| 2 | Launch the Sonus Cloud Link Deployer from icon on the desktop Launch PowerShell. | ||||
| 3 | Execute the following command, and enter the appropriate password(s) when prompted:
|
Install-CcAppliance on the HA Slave Node
Check the first two actions:
| |||||
| 4 | Click Apply. | ||||
| 5 | After successful execution, remote | ||||
| Step | Action | ||||
|---|---|---|---|---|---|
| 1 | Remote desktop to the ASM of the
| ||||
| 26 | Launch PowerShell. | ||||
| 3 | Execute the following command for the HA Master, and enter the appropriate password(s) when prompted:
| ||||
| 4 | After configuring the SBC Edge for CCE, refer to Managing Your Office 365 Tenant to configure CCE update time and user. |
Integrating SBC Edge With CCE
After the CCE is deployed, integrate the
| Spacevars | ||
|---|---|---|
|
| Spacevars | ||
|---|---|---|
|
SIP Provider (193.168.210.103) – SBC Edge (193.168.210.125) – CCE (mediation Server: 193.168.210.123) – O365 Cloud...
the Sonus Cloud Link Deployer from icon on the desktop. | |
| 7 | Check the first two action.
|
| 8 | Click Apply. |
| Caption | ||||
|---|---|---|---|---|
| ||||
|

| Caption | ||||
|---|---|---|---|---|
| ||||
|

Install-CcAppliance on the HA Master Node
Step | Action | ||||
|---|---|---|---|---|---|
| 1 | Login Remote desktop to the WebUI of
ASM of the SBC Edge System 1. | ||||
| 2 | Navigate to Tasks > SBC Easy Setup and then click the Easy Configuration Wizard. | ||||
| 3 | Follow steps 1, 2, and 3 and then click Finish.
The wizard configures the necessary settings for SBC Edge-1 and CCE integration, after which you can see all relevant configuration items in Settings tab.
|
| Noprint |
|---|
Building Your SBC Edge-2 Configuration
| Launch the Sonus Cloud Link Deployer from icon on the desktop. | |
| 3 | Check the last two actions:
|
| 4 | Click Apply. |
| Caption | ||||
|---|---|---|---|---|
| ||||
|
Install-CcAppliance on the HA Slave Node
| Step | Action | ||||
|---|---|---|---|---|---|
| 1 | Login Remote desktop to the WebUI of
| ||||
| 2 | Navigate to Tasks > SBC Easy Setup and then click the Easy Configuration Wizard. | ||||
| 3 | Follow steps 1, 2, and 3 and then click Finish.
The wizard configures the necessary settings for SBC Edge-2 and CCE integration, after which you can see all relevant configuration items in Settings tab. |
Adding Mediation Server FQDN Entries
The Mediation Server FQDNs must be added to SIP Server Table and SIP Signaling Group Federated FQDN fields with the following information:
- On SBC-Edge 1, add the CCE-2's Mediation Server FQDN into SIP Server Table as well as into SIP Signaling Group Federated IP/FQDN list as shown below:
- On SBC-Edge 2, add the CCE-1's Mediation Server FQDN into SIP Server Table as well as into SIP Signaling Group Federated IP/FQDN list as shown below:
...
ASM of the SBC Edge System 2. | |
| 2 | Launch the Sonus Cloud Link Deployer from icon on the desktop. |
| 3 | Check the third action:
|
| 4 | Click Apply. The Installation time depends on the bandwidth between the Master and the Slave. |
| 5 | After configuring the SBC Edge for CCE, refer to Managing Your Office 365 Tenant to configure CCE update time and user. |
| Caption | |||||
|---|---|---|---|---|---|
| |||||
|


O365 Known Issue and Workarounds for CCE
Redeploying the CCE
Re-Initializing the ASM
Both ASMs must be re-initialized with the latest image that contains the latest CCE software (in this example it is version 1.4.1).
...
Integrating SBC Edge With CCE
...
After the CCE is deployed, integrate the
| Spacevars | ||
|---|---|---|
|
| Spacevars | ||
|---|---|---|
|
...
for:
...
Select the appropriate image from the drop-down menu and click Apply.
SIP Provider (193.168.210.103) – SBC Edge (193.168.210.125) – CCE (mediation Server: 193.168.210.123) – O365 CloudBuilding Your SBC Edge-1 Configuration
| Step | Action |
|---|---|
| 1 | Login to the WebUI of SBC Edge-1. |
| 2 | Navigate to Tasks > SBC Easy Setup and then click the Easy Configuration Wizard. |
| 3 | Follow steps 1, 2, and 3 and then click Finish. The wizard configures the necessary settings for SBC Edge-1 and CCE integration, after which you can see all relevant configuration items in Settings tab. |
| Caption | ||||
|---|---|---|---|---|
| ||||
|

Building Your SBC Edge-2 Configuration
| Step | Action |
|---|---|
| 1 | Login to the WebUI of SBC Edge-2. |
| 2 | Navigate to Tasks > SBC Easy Setup and then click the Easy Configuration Wizard. |
| 3 | Follow steps 1, 2, and 3 and then click Finish. The wizard configures the necessary settings for SBC Edge-2 and CCE integration, after which you can see all relevant configuration items in Settings tab. |
| Caption | ||||
|---|---|---|---|---|
| ||||
|

| Multiexcerpt include | ||||
|---|---|---|---|---|
|
| Multiexcerpt include | ||||
|---|---|---|---|---|
|
Clean the Office 365 Tenant
If the CCE was previously deployed, previously installed information must be cleared in O365. To do so, follow the steps below.
| Step | Action |
|---|---|
| 1 | Remote desktop to the ASM system. |
| 2 | Launch PowerShell. |
| 3 | Execute the following command:
Import-Module skypeonlineconnector$cred = Get-Credential
|
| 4 | When prompted, enter the credentials for O365 Admin Tenant.
|
| 5 | Execute the following command:
$Session = New-CsOnlineSession -Credential $cred -VerboseImport-PSSession $session
|
| 6 | To remove the current appliance, run the following command and copy the Identity into your clipboard:
Get-CsHybridPSTNAppliance
|
| 7 | Enter the following command to remove the appliance:
Unregister-CsHybridPSTNAppliance -Identity <paste the identity here> -Force |
| 8 | Enter the following command to verify that the appliance has been removed:
Get-CsHybridPSTNAppliance |
| 9 | This completes the cleanup. Continue to Configuring the CCE |
Updating the CCE Password
Follow these steps if the CCE deployment cannot open the PFX certificate due to a password mismatchyou need to update the O365 tenant admin password or account.
| Step | Action | ||
|---|---|---|---|
| 1 | Re-perform the steps in Preparing the CCE to specify a new Password for the PFX file. | On the WebUI, click Tasks and select the Prepare CCE tab (see Preparing the CCE). | |
| 2 | Click Prepare CCE. | ||
| 3 | From the Password Setting drop down list, select Change Password. Keep the same passwords for the Edge Server, CCE Service and CA Backup File, but change the passwords for Tenant Account User and Tenant Account Password. | ||
| 4 | On Remote desktop, start the Sonus Cloud Link Deployer, and check Transfer Password from SBC | 2 | Use the PowerShell commands Install-CcAppliance -UpdateAllCredentials and Set-CcCredential -AccountType TenantAdminto reset the credentials. |
| Pagebreak |
|---|
Overview
Content Tools