Page History
| Include Page | ||||
|---|---|---|---|---|
|
In This Section...
| Table of Contents | ||
|---|---|---|
|
...
| width | 800px |
|---|
...
On this Page
...
Overview
This Best Practice describes One Number Fax (ONF) feature configuration for the SBC Edge in
| Spacevars | ||
|---|---|---|
|
...
| Info |
|---|
This document assumes the SBC is already configured with Exchange UM Server. See Best Practices - Upstream Deployment in PSTN - UX - eUM Server Setup. |
| Panel | ||||||||
|---|---|---|---|---|---|---|---|---|
| ||||||||
|
Configure One Number Fax
The table below lists the configuration steps required for One Number Fax; each of these steps is detailed below.
...
- Log into the WebUI and navigate to Active Directory> Domain Controller.
Create an entry with your domain controller's IP or FQDN (with the Call Route DC type, relevant search scope, and an LDAP query attribute), as shown below:
Panel borderStyle none Caption 0 Figure 1 Create Domain Controller Navigate to Active Directory> Configuration and configure it as shown below:
Panel borderStyle none Caption 0 Figure 1 Configure AD Pagebreak
Step 2: Configure Transformation Tables
...
Log into the WebUI and navigate to Transformation.
Create a transformation entry to passthrough the Called Address/Number as shown below.
NOTE: In the example below, the endpoint extension numbers and the eUM Subscriber Number are 3xxx-.Panel borderStyle none Caption 0 Figure 1 Create Transformation Entry - Endpoint Extension and eUM Subscriber Log into the WebUI and navigate to Transformation.
Create a transformation entry to passthrough the Called Address/Number as shown below.
NOTE: When a call is referred to the Fax Server by eUM, the request header does not contain an extension number. Therefore, this piece of transformation is needed for the calls going to Fax Server.Panel borderStyle none Caption 0 Figure 1 Create Transformation Entry - Fax Server by eUM Pagebreak
Step 3: Configure Routing Tables
...
- Log into the WebUI and navigate to the Call Routing Table.
Create the following two Call Routing Table Entries.
In Fax Calls where the CNG tone will be detected, a second entry needs to be added in the table to route calls to FAX Server:Panel borderStyle none Caption 0 Figure 1 Create Fax Entry
For Voice calls, there is no need for an entry to Fax Server, therefore we create a Route Table for one entry for number transformation:Panel borderStyle none Caption 0 Figure 1 Create Voice Entry Pagebreak
Step 4: Create Action Configuration and Action Set
Log in to WebUI and navigate to Call Actions.
Configure an Action Configuration as shown below:
Panel borderStyle none Caption 0 Figure 1 Configure Action Configuration Table
If you plan to utilize AD in Call Route, create an Action Set as shown below:Panel borderStyle none Caption 0 Figure 1 Use AD in Call Route If you plan NOT to utilize AD in Call Routes, create an Action Set as shown below:
Panel borderStyle none Caption 0 Figure 1 AD not used Not Used in Call Route Pagebreak
Step 5: Configure Media List
- Log into the WebUI. on to WebUI and navigate to Media List in navigation pane.
Create/Modify the Media List to have T.38 Media Profile and CNG Tone Detection enabled as shown below:
Panel borderStyle none Caption 0 Figure 1 Media List Configuration Pagebreak
Step 6: Create Signaling Group
...
| Panel | |||||||
|---|---|---|---|---|---|---|---|
| |||||||
|
| Pagebreak |
|---|
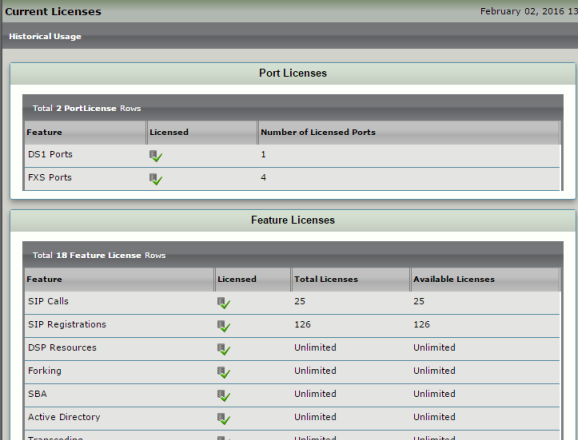
Licensing
Ensure DS1, SIP, and the Active Directory licenses are available in your node as shown below:
| Panel | |||||||
|---|---|---|---|---|---|---|---|
| |||||||
|
| Pagebreak |
|---|


