To install and configure
Download the
Unable to show "metadata-from": No such page "_space_variables"artifacts install-ev.sh and ev-fullpkg.tar.xz to the /opt directory of your system (reach out to support@rbbn.com for the URLs of these artifacts):cd /opt/ wget ftp://$url_from_support wget ftp://$url_from_support
Enable read-write-execute permissions for the copied files using the command given below:
chmod +x install-ev.sh
Validate installation media readiness using the command given below:
pwd && ls -alh
As depicted in the example screenshot, confirm the two files exhibit approximately the same size and permissions.Execute the following command to start installation process:
./install-ev.sh
The installation continues by installing Docker Compose, Docker and
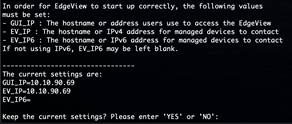
Unable to show "metadata-from": No such page "_space_variables". The GUI_IP, EV_IP, and EV_IP6 values should be set so thatUnable to show "metadata-from": No such page "_space_variables"works properly. Respond to any prompts that arise, especially the GUI_IP, EV_IP, and EV_IP6 prompt which is critical to the installation. GUI_IP, EV_IP, and EV_IP6 values must be set so thatUnable to show "metadata-from": No such page "_space_variables"works properly.GUI_IP - The host name or address that the users can use to access
Unable to show "metadata-from": No such page "_space_variables"from the browser's address bar.NoteGUI_IP must be the same as either EV_IP or EV_IP6.
EV_IP - The host name or IPv4 address for the managed devices to contact
Unable to show "metadata-from": No such page "_space_variables".EV_IP6 - The host name or IPv6 address for managed devices to contact
Unable to show "metadata-from": No such page "_space_variables".NoteThe EV_IP6 address is not set by default. If you want to access
Unable to show "metadata-from": No such page "_space_variables"using IPv6 modify the current settings and provide the EV_IP6 address.
The installation creates a log file of all actions for historical review/troubleshooting. The resultant filename is in the format of $MM-DD-YYYY-ev-install.log
You are prompted to enter information related to your networking configuration. Read this section carefully and enter the appropriate values applicable to your environment.
Once installation completes, the console screen displays the message “Unable to show "metadata-from": No such page "_space_variables"Installation/Upgrade Completed ”. A directory named scc-build is created.To check whether the containers started successfully, use the following command:
docker ps --format "table {{.ID}}\t{{.Image}}\t{{.Status}}\t{{.Names}}"TipMake sure that the STATUS is healthy. If there are unhealthy statuses, run the following command and check the Health section of the output:
docker inspect $container_name
For example:
docker inspect scc
Once the installation completes, optionally run a basic sanity check using the command given below:s
cd /opt/scc-build ; ./ev_check.sh post-install
For initial SCC configuration, register your
Unable to show "metadata-from": No such page "_space_variables"server by accessing it through the web interface at its IP address and entering the registration information that you received in your email. If the registration information is not available, reach out to support@rbbn.com.NoteRefer to Manually Configure ZTP when upgrading from
Unable to show "metadata-from": No such page "_space_variables"15.2.0 or 15.2.1.- Enter the Unable to show "metadata-from": No such page "_space_variables"admin registration details, and then click NEXT.
- Enter the Tenant Admin registration details, and then click NEXT.
- Click APPLY to complete the registration.
- Click LOGIN to navigate to the login screen.
- Enter the credentials and click SIGN IN to log in to Unable to show "metadata-from": No such page "_space_variables".
To disable THP on the Host OS:
Enter the following command as Root user:
echo never > /sys/kernel/mm/transparent_hugepage/enabled
- Add it to your /etc/rc.local directory in order to retain the setting after a reboot.
Restart Redis once THP is disabled.


