| Add_workflow_for_techpubs |
|---|
| AUTH2 | UserResourceIdentifier{userKey=8a00a0c85b2726c2015b58aa779d0003, userName='null'} |
|---|
| AUTH1 | UserResourceIdentifier{userKey=8a00a0c857f0393d015845e3e4d4000f, userName='null'} | AUTH1 | cclemetson |
|---|
| JIRAIDAUTH | SYM-2288324195 |
|---|
| REV5 | cclemetsonUserResourceIdentifier{userKey=8a00a0c85b2726c2015b58aa779d0003, userName='null'} |
|---|
| REV6 | cclemetsonUserResourceIdentifier{userKey=8a00a0c85b2726c2015b58aa779d0003, userName='null'} |
|---|
| REV3 | john-warrenUserResourceIdentifier{userKey=8a00a02355cd1c2f0155cd26c7ca0038, userName='null'} |
|---|
| REV1 | tomtUserResourceIdentifier{userKey=8a00a02355cd1c2f0155cd26cc5207f0, userName='null'} |
|---|
|
The
Web
interface includes UI provides a built-in
step-by-step setup Easy Configuration wizard
, which enables end-users to quickly that lets you quickly and easily deploy the
within a couple of minutes. Depending on the scenario or application in which the is deployed, the Easy Configuration Wizard configures the , for operation with provider endpoints (SIP trunk, ISDN PSTN trunk, or IP PBX trunk) and user endpoints (Microsoft Teams, Microsoft On Premises - Skype for Business/Lync, IP Phones, or ISDN
in a very easy mannerPBX or IP PBX).
Running the Wizard
Run the
Easy
Configuation Configuration Wizard
(Easy Config) through
an Initial setup
, or through the WebUI
Task's
Tasks tab.
See For more information, refer to Using the Easy Configuration Wizard.
Navigating the Wizard
Once the
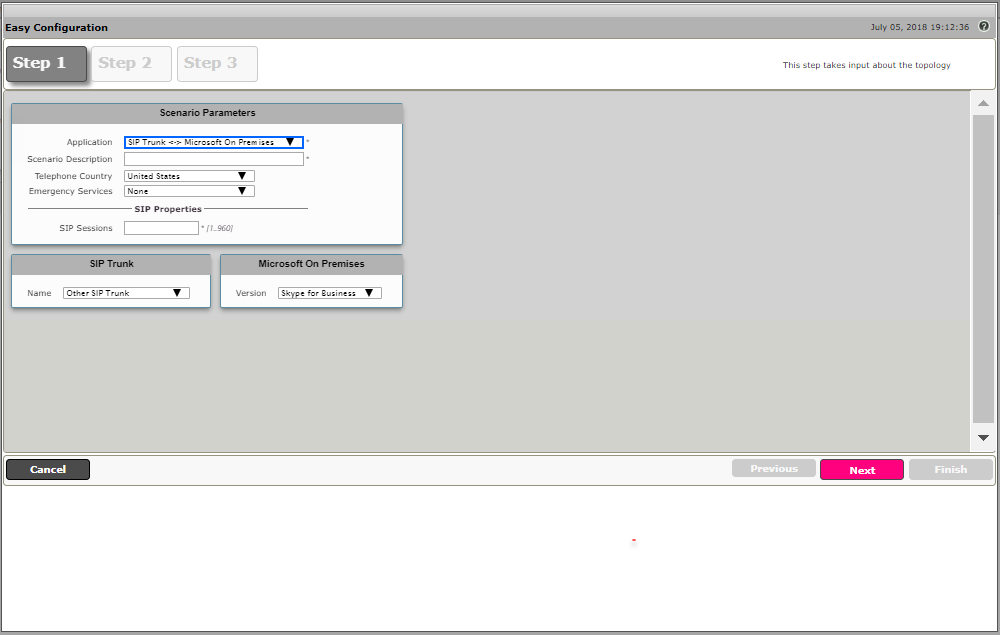
Easy Configuration Wizard is running (see Using the Easy Configuration Wizard), a set of three configuration steps are presented.Step 1. Choose the provider and user endpoint to create the topology.
From the Tasks tab of the WebUI, go to SBC Easy Setup (navigation pane) and click Easy Config Wizard. As the wizard runs, it directs you through three configuration steps:
Step 1. Set the following parameters to describe the topology for the telephony service provider and user ends of the scenario:
- Application. Click the drop-down arrow, then select the Service Provider and user endpoint types that Provider. Service Provider end the will connect to.User Endpoint. Mediation Service, IP-PBX, or IP Phones the connects to at the customer premises is to connect.
- Scenario Description. Type up to 32 characters to describe the connectivity scenario.
- Telephone Country. Click the drop-down arrow, then select the country in which the telephone services operate.
- Emergency Services. Choose ELIN Identifier, E911/E112, or None as the emergency services type.
- SIP Sessions. Type a number from 1-960 to indicate the SIP sessions to allocate for the scenario.
Step 2. Configure the items required for the endpoint selected (these items depend endpoints selected; fields display based on the endpoint selection in Step 1).
Step 3. The endpoint data is validated and Easy Config validates the final parameters and displays a read-only summary of the configuration items is displayed (these are the items that will be configured on the system). This form can be submitted, or that the wizard will apply when you click Finish at Step 3. Before you click Finish, you can return to previous steps and change any datato make adjustments to the data summarized.
The wizard contains displays the following buttons for navigation:
- Previous: Moves back to the previous step.
- Next: Advances to the next step when the current step is validated and complete.
- Finish: Submits the data to the .
- Cancel. : Cancels the Easy Configuration data entered and redirects to the main WebUI.
| Info |
|---|
User input is validated at every Easy Config validates data at each step of the wizard. The user is prevented from navigating wizard displays messages and blocks navigation to the next step if when the data and selections for the current step is are not valid. |
Navigation You can also be performed navigate through the Wizard by clicking the Step buttons. The However, steps ahead of beyond the current step are disabled , but once the step is complete, click on the desired step to go backuntil the data for current step is validated successfully. Click on the step of your choice to view prior Step fields.
| Panel |
|---|
|
| Caption |
|---|
| 0 | Figure |
|---|
| 1 | Step Buttons |
|---|
| 3 | Step Buttons |
|---|
|  |
|
Selecting a Template
Up to six The following application scenarios are available (through configurable from the Application drop-down list , available in of the Application field (Step 1.)).
- SIP Trunk ↔ Microsoft Teams
- SIP Trunk ↔ Microsoft UCOn Premises
- SIP Trunk ↔ ISDN PBX
- SIP Trunk ↔ IP Phones
- SIP Trunk ↔ Trunk ↔ IP PBX
- ISDN PSTN ↔ Microsoft UCTeams
- ISDN PSTN ↔ Microsoft on Premises
- FXO ↔ Microsoft UC On Premises (available for and FXO Analog only)
- IP PBX ↔ Microsoft Teams
After you select a scenarioOnce the scenario is selected, the corresponding template is displayeddisplays.