Page History
...
| Note | ||||
|---|---|---|---|---|
Perform these steps on both
|
| Note |
|---|
If you configure TLS and downgrade the system to a release prior to Release 7.0, the Exchange CA Certificate for TLS will be unavailable; you must re-deploy or upgrade to Release 7.0. Along with TLS configuration on the CCE, the TLS capability requires a loaded Root CA certificate and a signed certificate on the SBC. |
| Step | Action | ||||||||||||||
|---|---|---|---|---|---|---|---|---|---|---|---|---|---|---|---|
| 1 | Login to the WebUI of the SBC Edge. | ||||||||||||||
| 2 | Navigate to Tasks > Office 365 Cloud Connector Edition> Setup. | ||||||||||||||
| 3 | Click the Configure CCE tab. | ||||||||||||||
| 4 | Configure all necessary information and then click OK.
| ||||||||||||||
| 5 | After receiving the activity status as successfully completed, click the Prepare CCE tab to continue. |


| Warning |
|---|
Verifying and Updating the CCE Configuration INI File
You must verify (and possibly correct) the CCE Configuration INI File after configuring the CCE.
| Info |
|---|
When deploying a High Availability (HA) systems, it is important to have Management IP Prefix unique on each HA system. For instance, if your HA Master CCE system has 192.168.213.x as the Management IP Prefix, you need to be sure to configure this attribute differently on HA Slave system. While doing this, also make sure that subnet that you are defining in this field does not conflict in your IP infrastructure. |
| Note | ||||
|---|---|---|---|---|
Perform these steps on both
|
Follow these steps to verify and correct values in the CCE Configuration INI File.
| Step | Action |
|---|---|
| 1 | Login to the WebUI of the SBC Edge. |
| 2 | Click the Configure CCE tab and then click Click to re-configure CCE application. |
| 3 | Click OK on the popup dialog box. |
| 4 | Click the Raw (INI) Config drop-down list, and select an option:
|
| 5 | Verify/correct the values in the CCE Configuration INI File and then click OK. |
...
Note: Enterthe ASM's IP address in the HA Master IP Address field. The Slave uses the same root certification as the Master, and this location contains the shared folder that contains the Root CA of the Master. | ||||||||||||||||
| 5 | After receiving the activity status as successfully completed, click the Prepare CCE tab to continue. |
| Warning |
|---|
Verifying and Updating the CCE Configuration INI File
You must verify (and possibly correct) the CCE Configuration INI File after configuring the CCE.
| Info |
|---|
When deploying a High Availability (HA) systems, it is important to have Management IP Prefix unique on each HA system. For instance, if your HA Master CCE system has 192.168.213.x as the Management IP Prefix, you need to be sure to configure this attribute differently on HA Slave system. While doing this, also make sure that subnet that you are defining in this field does not conflict in your IP infrastructure. |
...
| Note | ||||||
|---|---|---|---|---|---|---|
Perform these steps on both
|
Follow these steps to verify and correct values in the CCE Configuration INI File.
| Step | Action |
|---|---|
| 1 | Login to the WebUI of both the SBC Edge systems. |
| 2 | Navigate to Tasks > Office 365 Cloud Connector Edition> Setup. |
| 3 | Click the Prepare CCE tab. |
| 4 | Click the Prepare CCE button. Enter the requested password. A confirmation will request you to enter the password again. The same password should be used on all Appliances in the site. Click OK as shown below. |
| 5 | To complete the deployment, continue with Activating the CCE. |
...
| Click the Configure CCE tab and then click Click to re-configure CCE application. | |
| 3 | Click OK on the popup dialog box. |
| 4 | Click the Raw (INI) Config drop-down list, and select an option:
|
| 5 | Verify/correct the values in the CCE Configuration INI File and then click OK. |
Preparing the CCE
| Anchor | ||||
|---|---|---|---|---|
|
| Note | ||||
|---|---|---|---|---|
Perform these steps on both
| ||||
| Info | ||||
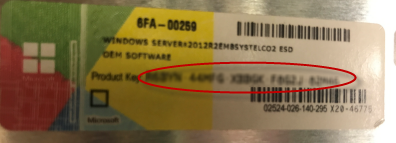
Each CCE requires four VMs; each Microsoft Product Key activates two VMs. |
| Step | Action |
|---|---|
| 1 | Login to the WebUI of each both SBC Edge systems. |
| 2 | Navigate to Tasks > Office 365 Cloud Connector Edition> Setup. |
| 3 | Click the Cutomize CCE VMs tab. |
| 4 | In Domain Controller and Central Management Store VM > Windows Product Key 1, enter the first Microsoft Product Key. To identify the Product Key, see Identify Microsoft Product Key. |
| 5 | In Under Mediation Server and Edge Server VM > Windows Product Key 2, enter the second Microsoft Product Key.To identify the Product Key, see Identify Microsoft Product Key. |
| 6 | From the Proxy Usage drop down list, select Enabled (enables the Proxy Server on the DMZ facing the internal network) If you select Disable, the Proxy Server is disabled. |
| 7 | In the Proxy Server IP Address field, enter the server IP address for the Proxy Server in IPv4 format. This field is available only when Proxy Usage is set to Enabled. |
| 8 | In the Proxy Server Port field, enter the port number for the Proxy Server. Valid entry: 1 - 65535. This field is available only when Proxy Usage is set to Enabled. |
| 9 | Click Apply. |
| 10 | Access Tasks> Operational Status to verify Windows Activation. If activation fails, see Troubleshooting. |
| 11 | To complete the deployment, continue with installing the Installing the CCE Appliance using Sonus Cloud Link Deployer. |
| Caption | ||||
|---|---|---|---|---|
| ||||
|

...
| title | Identify Microsoft Product Key |
|---|
...
| title | Activation - Troubleshooting Tips |
|---|
...
- If access to the Microsoft Server fails, verify IP and Firewall configuration.
- Verify each Product Key has not reached the allowed limit of 15 activations.
- Verify correct entry of the Product Key.
Set CCE Private Certificate
This step synchronizes the CCE and SBC CA Certificate, or Renews the CCE CA or CCE Certificate.
| Info |
|---|
This feature applies to SBCs running ASM with the Office 365 Cloud Connector Edition image. |
| Note |
|---|
If you configure TLS and downgrade the system to a release prior to Release 7.0, the Exchange CA Certificate for TLS will be unavailable; you must re-deploy or upgrade to Release 7.0. Along with TLS configuration on the CCE, the TLS capability requires a loaded Root CA certificate and a signed certificate on the SBC. |
| Note |
|---|
These instructions assume the SBC Edge already includes a valid Trusted CA (which issues the Sonus SBC Certificate). For more information, refer to Working with Certificates. You will not be able to complete Step 4: Synchronize CCE/SBC CA Certificate without a valid Trusted CA in SBC Edge. |
...
For SBC-1: three options are available, when needed:
- Synchronize CCE/SBC CA Certificate. Synchronizes the CCE/SBC CA certificate; certificate information is exchanged between the CCE and SBC CA.
- Renew CCE CA Certificate. Renews CCE CA certificate.
- Renew CCE Certificate. Renews the CCE certificate.
Note: The CCE CA and CCE Certificates are valid for two years.
...
For SBC-2: three options are available, when needed:
- Synchronize CCE/SBC CA Certificate. Synchronizes the CCE/SBC CA certificate; certificate information is exchanged between the CCE and SBC CA.
- Renew CCE CA Certificate. Renews CCE CA certificate.
- Renew CCE Certificate. Renews the CCE certificate.
...
To complete the deployment, continue with installing the CCE Appliance using the Sonus Cloud Link Deployer.
| Click the Prepare CCE tab. | |
| 4 | Click the Prepare CCE button. Enter the requested password. A confirmation will request you to enter the password again. The same password should be used on all Appliances in the site. Click OK as shown below. |
| 5 | To complete the deployment, continue with Activating the CCE. |
| Anchor | ||||
|---|---|---|---|---|
|
This step stores the two Microsoft product keys, and customizes the CCE VM (which is not yet activated).
| Note | ||||
|---|---|---|---|---|
Perform these steps on both
|
| Info |
|---|
Each CCE requires four VMs; each Microsoft Product Key activates two VMs. |
| Step | Action |
|---|---|
| 1 | Login to the WebUI of each SBC Edge. |
| 2 | Navigate to Tasks > Office 365 Cloud Connector Edition> Setup. |
| 3 | Click the Cutomize CCE VMs tab. |
| 4 | In Domain Controller and Central Management Store VM > Windows Product Key 1, enter the first Microsoft Product Key. To identify the Product Key, see Identify Microsoft Product Key. |
| 5 | In Under Mediation Server and Edge Server VM > Windows Product Key 2, enter the second Microsoft Product Key.To identify the Product Key, see Identify Microsoft Product Key. |
| 6 | From the Proxy Usage drop down list, select Enabled (enables the Proxy Server on the DMZ facing the internal network) If you select Disable, the Proxy Server is disabled. |
| 7 | In the Proxy Server IP Address field, enter the server IP address for the Proxy Server in IPv4 format. This field is available only when Proxy Usage is set to Enabled. |
| 8 | In the Proxy Server Port field, enter the port number for the Proxy Server. Valid entry: 1 - 65535. This field is available only when Proxy Usage is set to Enabled. |
| 9 | Click Apply. |
| 10 | Access Tasks> Operational Status to verify Windows Activation. If activation fails, see Troubleshooting. |
| 11 | To complete the deployment, continue with installing the Installing the CCE Appliance using Sonus Cloud Link Deployer. |
| Caption | ||||
|---|---|---|---|---|
| ||||
|
| Info | ||||||
|---|---|---|---|---|---|---|
| ||||||
|
| Info | ||||||
|---|---|---|---|---|---|---|
| ||||||
|
| Info |
|---|
See Managing Cloud Connector Edition Private Certificates for the following setup options:
|
| Caption | ||||
|---|---|---|---|---|
| ||||
|
| 0 | Figure |
|---|---|
| 1 | SBC 2 - CCE Private Certificate |

| Anchor | ||||
|---|---|---|---|---|
|
...
| title | CCE Deployment - Using a Proxy on the ASM Host |
|---|
|
...
| Note | ||
|---|---|---|
| ||
|
...
| Caption | ||||
|---|---|---|---|---|
| ||||
|

| Multiexcerpt include | ||||
|---|---|---|---|---|
|
| Multiexcerpt include | ||||
|---|---|---|---|---|
|
Updating the CCE Password
Follow these steps if you need to update the O365 tenant admin password or account.
| Step | Action |
|---|---|
| 1 | On the WebUI, run Preparing the CCE to specify a new Password. Select the existing password and enter the new password. Only the O365 should be modified for a running instance of CCE. |
| 2 | On Remote desktop, start the Sonus Cloud Link Deployer, and check Transfer Password from SBC to reset the credentials. |
Overview
Content Tools