Page History
| Add_workflow_for_techpubs | ||||||||||||
|---|---|---|---|---|---|---|---|---|---|---|---|---|
|
| Warning | ||
|---|---|---|
| ||
You must follow these steps completely and in the order shown. Failure to do so increases the risk of node failure. |
...
| Info |
|---|
For details on troubleshooting, see Troubleshooting Cloud Connector 6.1.2. |
This page provides a step-by-step procedure for Non for Non High Availability Deployment on SBC Edge CCEEdge CCE.
| Multiexcerpt | |||||||
|---|---|---|---|---|---|---|---|
| |||||||
Before You StartCCE Deployment ScenariosThe following diagram shows typical CCE deployment scenarios on a PSTN site. The PSTN site is a combination of Cloud Connector instances, deployed at the same location, and with common PSTN gateways pool connected to them. PSTN sites allow you to:
|
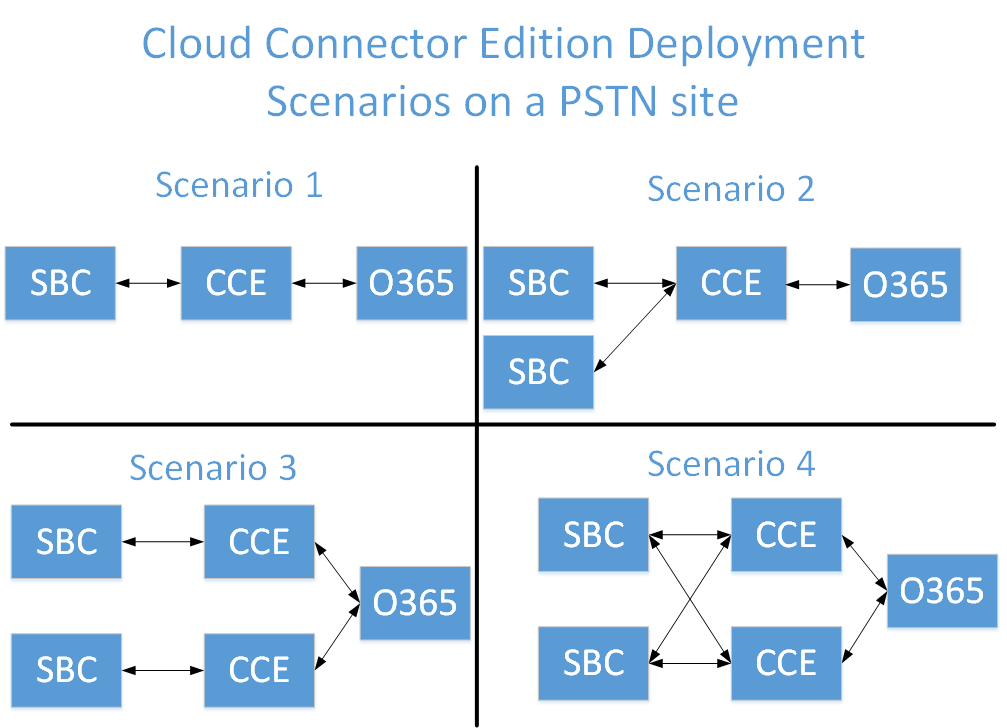
Scenario 3 and and Scenario 4 are are covered in Configuring the SBC Edge for Two CCEs. This document contains steps for for Scenario 1 and and Scenario 2 deployments deployments.
| Multiexcerpt | |||||||||||||||||||||||||||||
|---|---|---|---|---|---|---|---|---|---|---|---|---|---|---|---|---|---|---|---|---|---|---|---|---|---|---|---|---|---|
| |||||||||||||||||||||||||||||
Prerequisites
|
...
For this best practice, the Router/Firewall is configured using the following rules:
| Caption | ||||||||||||||||||||
|---|---|---|---|---|---|---|---|---|---|---|---|---|---|---|---|---|---|---|---|---|
| ||||||||||||||||||||
|
| Caption | ||||||||||||||||||||||||||||||||||||||||||||||||||||
|---|---|---|---|---|---|---|---|---|---|---|---|---|---|---|---|---|---|---|---|---|---|---|---|---|---|---|---|---|---|---|---|---|---|---|---|---|---|---|---|---|---|---|---|---|---|---|---|---|---|---|---|---|
| ||||||||||||||||||||||||||||||||||||||||||||||||||||
|
| Caption | |||||||||||||||||
|---|---|---|---|---|---|---|---|---|---|---|---|---|---|---|---|---|---|
| |||||||||||||||||
|
| Multiexcerpt | ||||
|---|---|---|---|---|
| ||||
DNS SettingsMake sure that CCE FQDN is resolving to the
|
Preparing Your Node
Preparing the the
| Spacevars | ||
|---|---|---|
|
Update the the
| Spacevars | ||
|---|---|---|
|
...
If your ASM have been used before, you should re-Initialize it now. Refer to to Re-Initializing the ASM for for details.
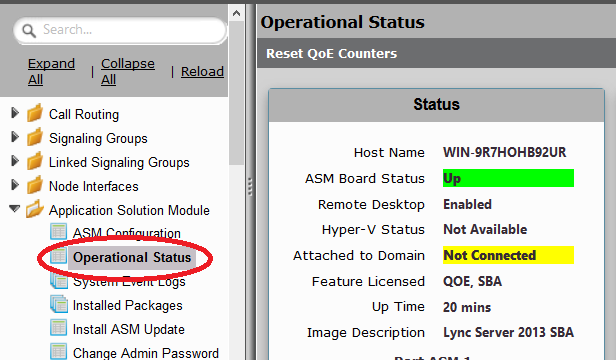
Confirm that the ASM is ready to deploy the Cloud Connector Edition. To do so:
| Step | Action |
|---|---|
| 1 | Login to the WebUI of the SBC Edge. |
| 2 | Click the Task tab and then select Operational Status. |
| 3 | Verify the following:
|
| Caption | ||||
|---|---|---|---|---|
| ||||
|
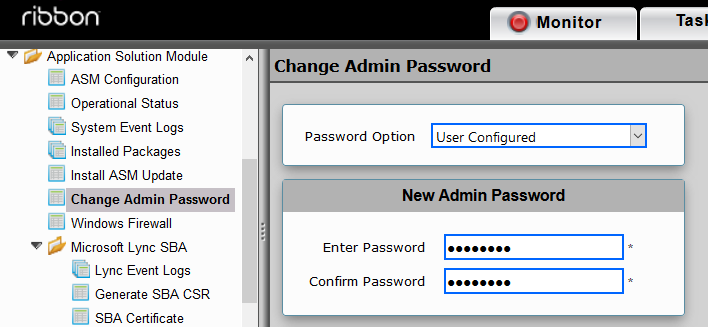
After you update the ASM, change its Admin Password.
| Step | Action |
|---|---|
| 1 | Login to the WebUI of the SBC Edge. |
| 2 | Click the Settings tab and then click Change Admin Password. |
| 3 | Enter and confirm your new password and then click OK. |
| Caption | ||||
|---|---|---|---|---|
| ||||
|
Deploying the CCE
Deploying the
...
CCE on the
| Spacevars | ||
|---|---|---|
|
...
consists of two steps:
- Setup CCE using the the
WebUI WebUI.Spacevars 0 product - Prepare the CCE deployment on the the
WebUI WebUI using the the Sonus Cloud Link Deployer.Spacevars 0 product
...
| Anchor | ||||
|---|---|---|---|---|
|
ASM Config
| Step | Action |
|---|---|
| 1 | Login to the WebUI of the SBC Edge. |
| 2 | Navigate to Tasks > Setup Cloud Connector Edition. |
| 3 | Click the ASM Config tab and configure/verify the Network and IP settings of your ASM. |
| 4 | Click Apply. After receiving the activity status as successfully completed, click the Generate CSR tab. |
...
This process is required only if you don't have a public certificate for your deployment. If you already have a certificate, proceed to proceed to Import Certificate.
| Step | Action |
|---|---|
| 1 | Login to the WebUI of the SBC Edge. |
| 2 | Navigate to Tasks > Setup Cloud Connector Edition > Generate CSR. |
| 3 | Generate the CSR as shown below with following information. To ensure creating a valid CSR for Cloud Connector Edition usage, please see the section "Certificate requirements" on https://technet.microsoft.com/en-us/library/mt605227.aspx . |
| 4 | Copy the CSR from the lower pane of the Generate CSR page and save it as a .txt file. |
| 5 | After the CSR is signed by the Certificate Authority and you receive the PKCS7 Certificate file, continue the wizard by clicking on Import Certificate tab. |
...
| Anchor | ||||
|---|---|---|---|---|
|
| Step | Action |
|---|---|
| 1 | Login to the WebUI of the SBC Edge. |
| 2 | Navigate to Tasks > Setup Cloud Connector Edition and then click the Import Certificate/Keys tab. |
| 3 | Click the Action drop-down list and select the appropriate option:
|
| 4 | Select the relevant certificate file using the Choose File button and then click OK. |
| 5 | Select the file by browsing to it using Select File. |
| 6 | Click OK. |
| 7 | After receiving the activity status as successfully completed, click on Configure CCE tab. |
Configuring the CCE
| Step | Action | ||
|---|---|---|---|
| 1 | Login to the WebUI of the SBC Edge. | ||
| 2 | Open the Tasks tab and click Setup Cloud Connector Edition in the navigation pane. | ||
| 3 | Click the Configure CCE tab. | ||
| 4 | Configure all necessary information and then click OK. All the pre-configured fields are valid as is, and recommended by Sonus. These fields may be edited, but all entries must meet Microsoft requirements.
| ||
| 5 | After After receiving the activity status as successfully completed, click click the Prepare CCE tab to continue. |
| Caption | ||||
|---|---|---|---|---|
| ||||
|

Preparing the CCE CCE
| Anchor | ||||
|---|---|---|---|---|
|
| Step | Action |
|---|---|
| 1 | Login to the WebUI of the SBC Edge. |
| 2 | Open the Tasks tab and click Setup Cloud Connector Edition in the navigation pane. |
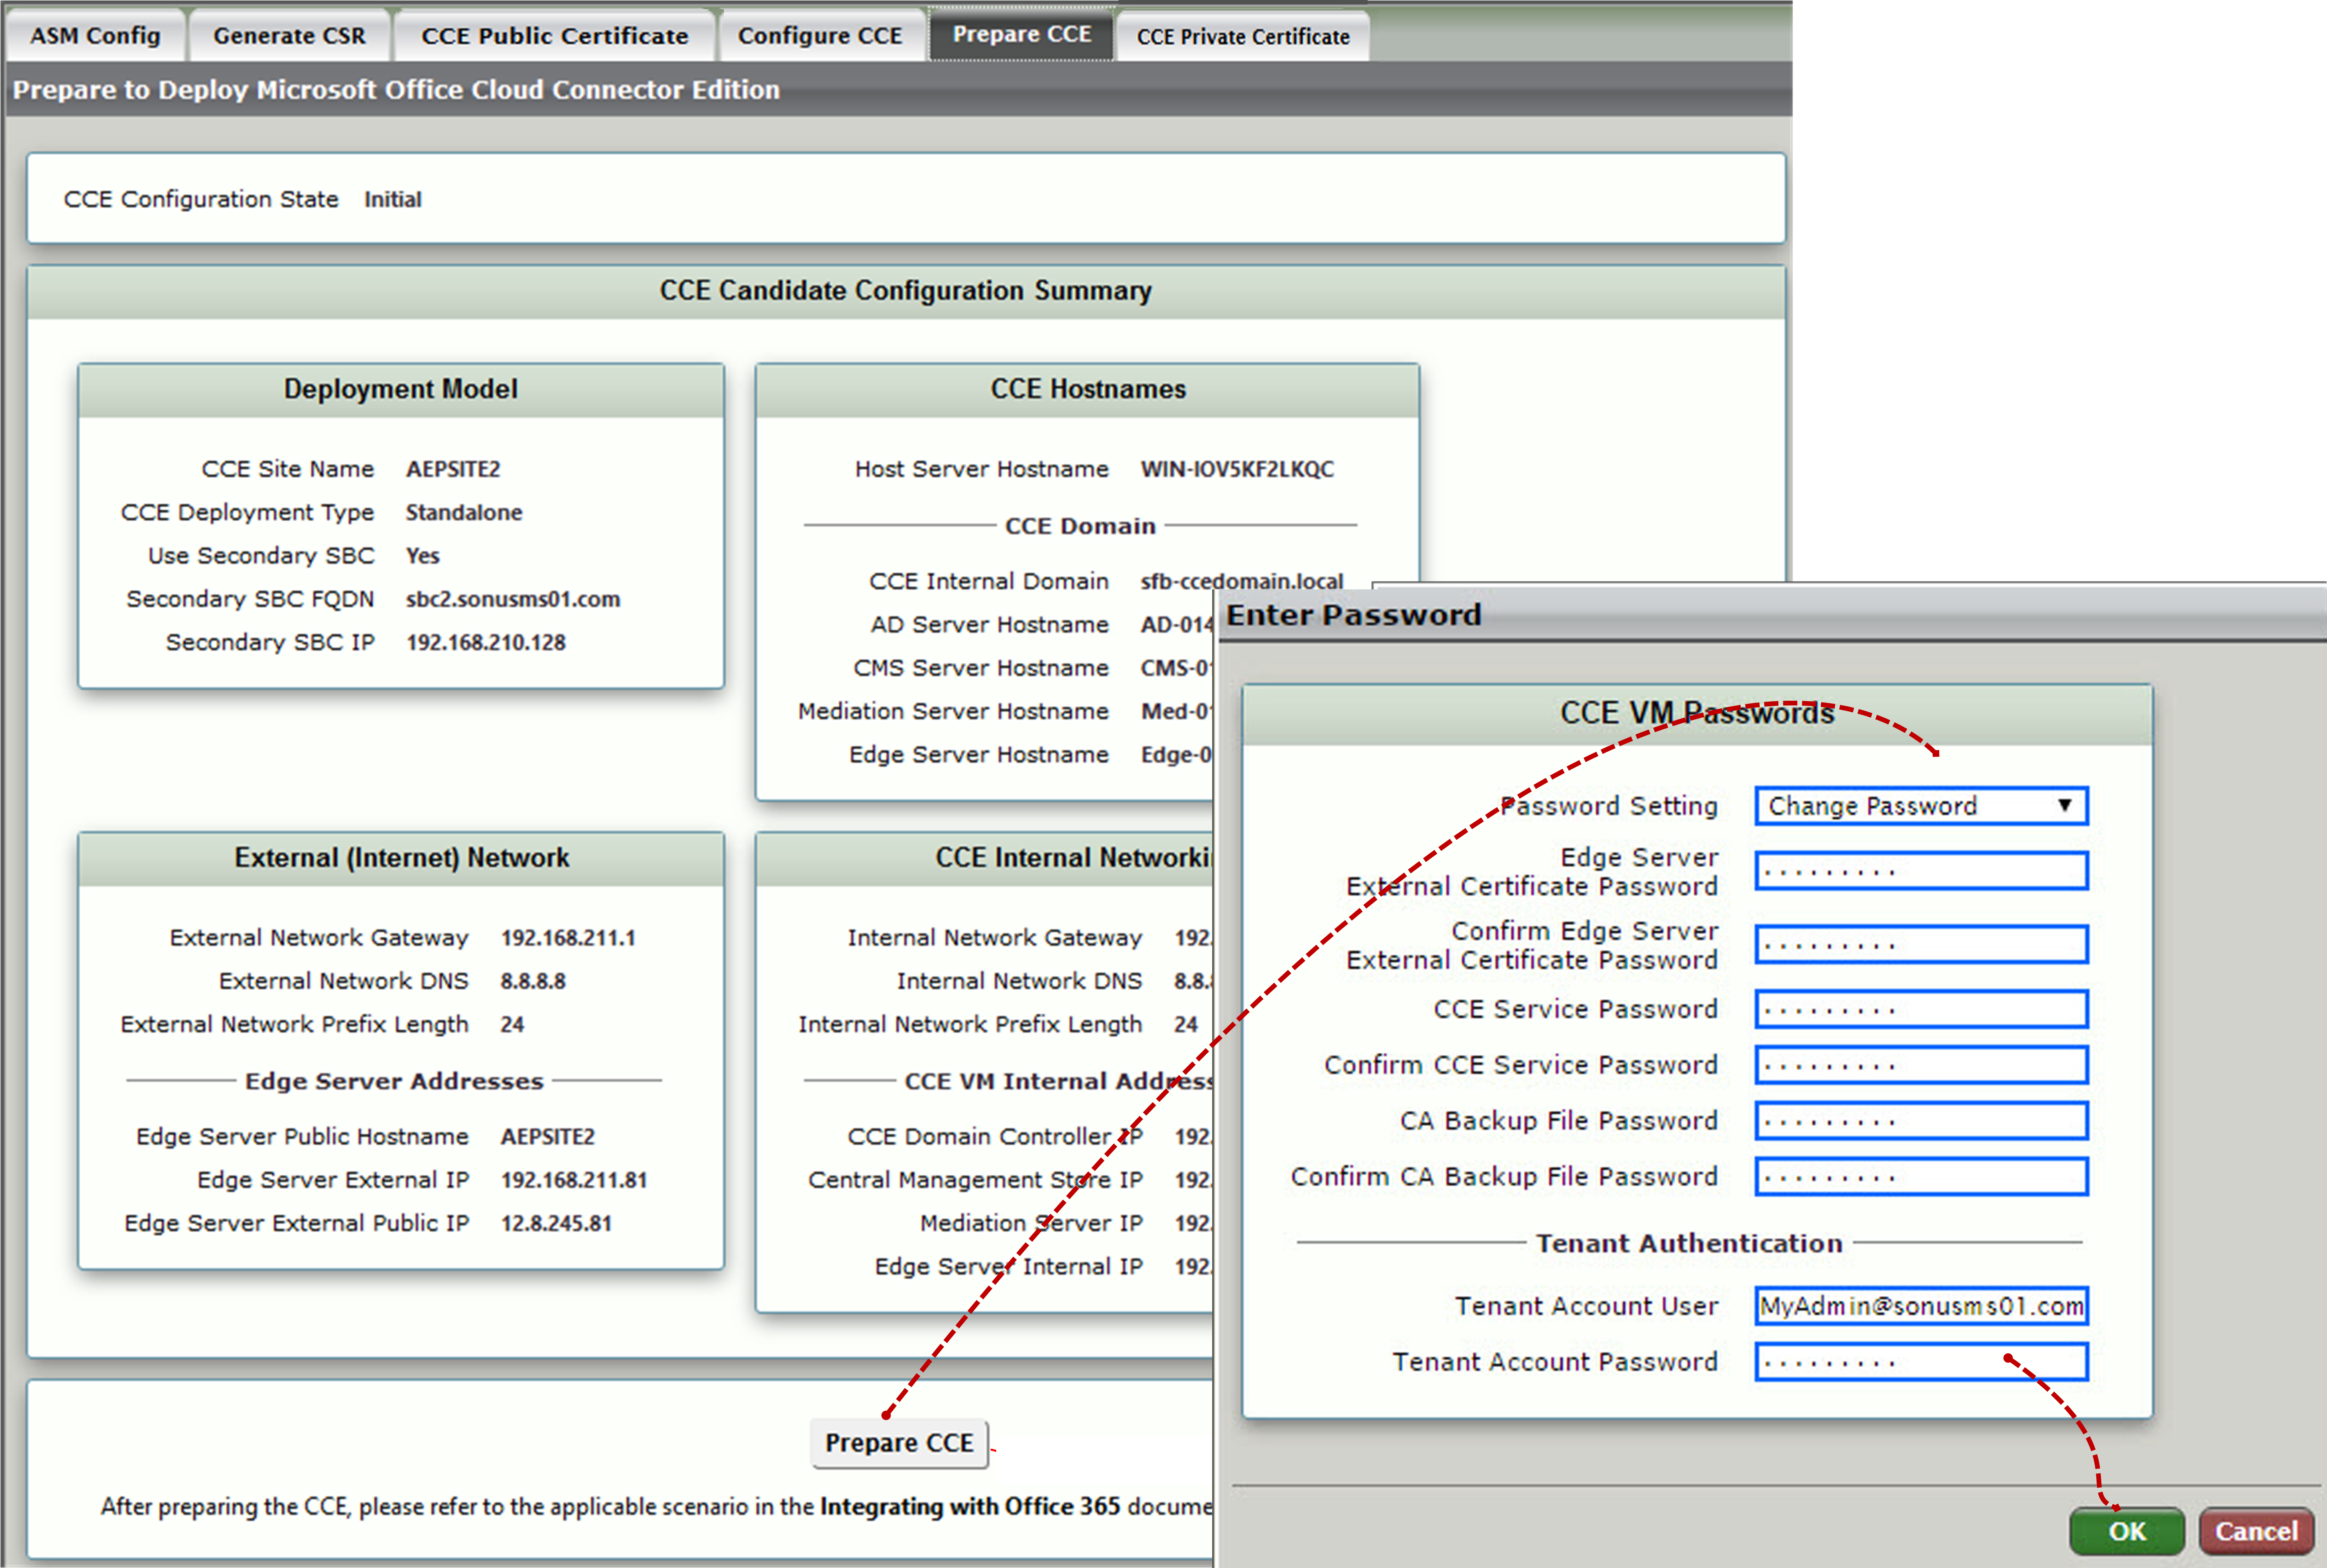
| 3 | Click the Prepare CCE tab. |
| 4 | Click the Prepare CCE button. Enter the requested password. A confirmation will request you to enter the password again for the new password. Only the Tenant credentials are already existing. Click OK as shown below. |
| 5 | To complete the deployment, continue with installing the CCE Appliance using the Sonus Cloud Link Deployer. |
| Caption | ||||
|---|---|---|---|---|
| ||||
|
| Anchor | ||||
|---|---|---|---|---|
|
| Note | ||
|---|---|---|
| ||
If you plan to use a proxy on the ASM Host to reach Office 365, you must add the Management network (192.168.213.0) into the exclusion list and specify proxy settings per machine rather than per user. |
| Note | ||
|---|---|---|
| ||
|
| Step | Action |
|---|---|
| 1 | Remote desktop to the ASM system. |
| 2 | Launch the Sonus Cloud Link Deployer from icon on the desktop. |
| 3 | Check the first three actions:
Select Apply. |
...
After the CCE is deployed, integrate the Sonus SBC Edge and allow calls from/to O365 clients. In this example, the following steps will set up the Sonus SBC Edge the Sonus SBC Edge for:
SIP Provider (193NNN.168NNN.210NNN.103NNN) – SBC Edge (193NNN.168NNN.210NNN.125NNN) – CCE (mediation Server: 193NNN.168NNN.210NNN.123NNN) – O365 Cloud |
Build your SBC configuration
| Step | Action |
|---|---|
| 1 | Login to the WebUI of the SBC Edge. |
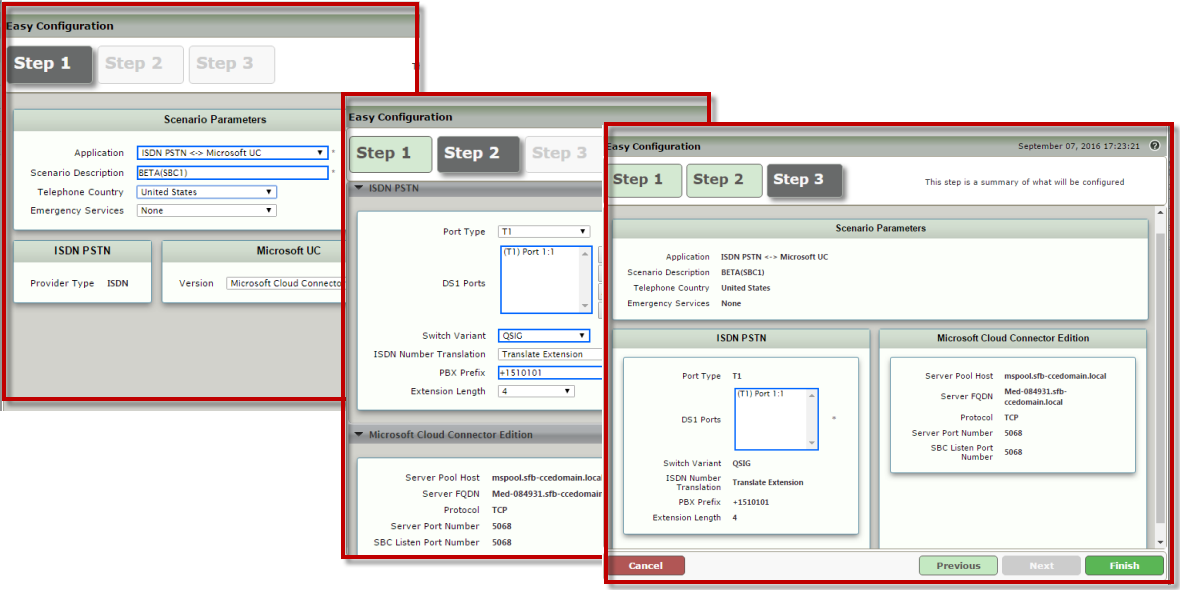
| 2 | Click the Tasks tab, and then click SBC Easy Setup > Easy Config Wizard in the navigation pane. |
| 3 | Follow steps 1, 2, and 3 as shown below and then click Finish.
|
| 4 | Click OK on the next two popups to complete the setup. |
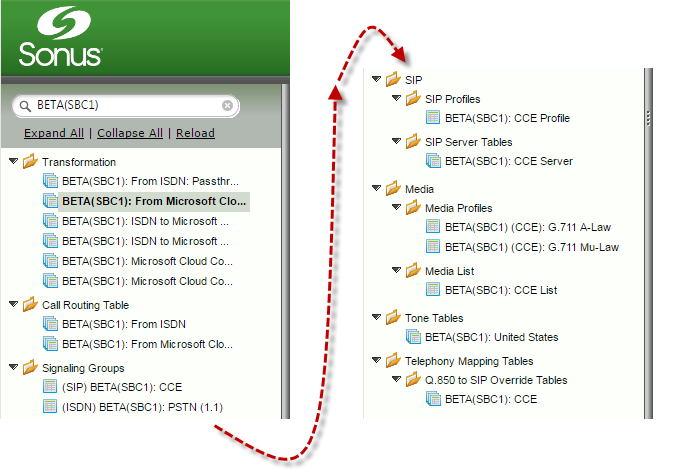
| 5 | The wizard configures the necessary settings for the single SBC Edge and CCE integration. Relevant configuration items are shown in the Settings tab below:
|
Build your Second SBC Configuration (Optional)
| Step | Action |
|---|---|
| 1 | Login to the WebUI of the Secondary SBC Edge. |
| 2 | Click the Tasks tab and then run the Easy Config. |
| 3 | The preceding step will configure the Secondary SBC Edge with the appropriate configuration items. |
| Multiexcerpt | ||||||||||||||||||||||||||
|---|---|---|---|---|---|---|---|---|---|---|---|---|---|---|---|---|---|---|---|---|---|---|---|---|---|---|
| ||||||||||||||||||||||||||
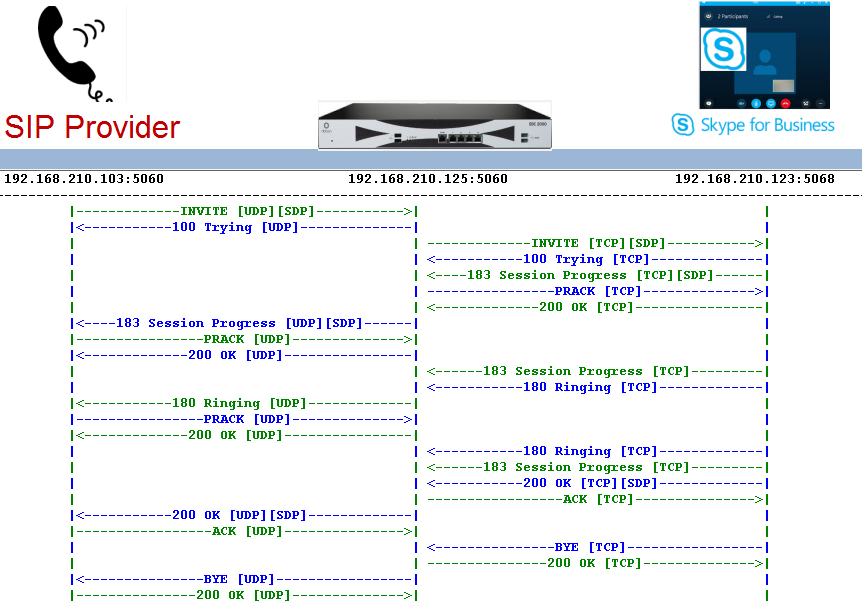
Basic Call Verification after CCE Deployment and Spacevars |
|
| Spacevars | ||
|---|---|---|
|
| Caption | ||||
|---|---|---|---|---|
| ||||
|
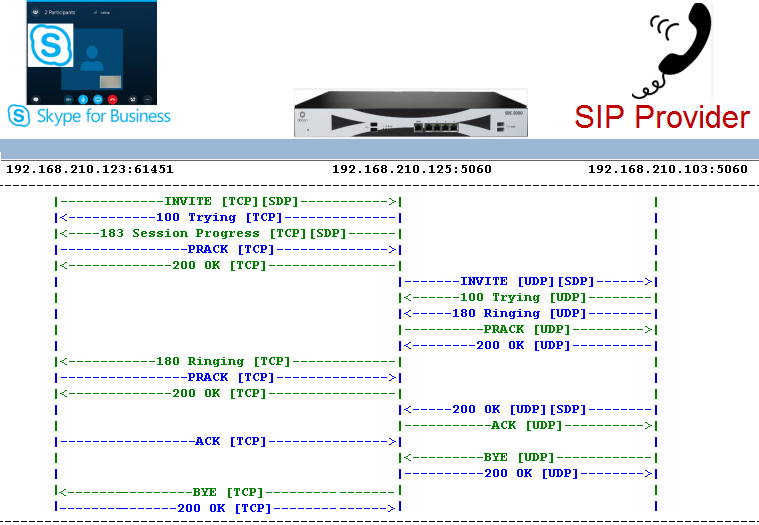
Similarly, a Skype For Business (O365) client can dial the number of an endpoint off of ITSP and reach out to it over
| Spacevars | ||
|---|---|---|
|
| Caption | ||||
|---|---|---|---|---|
| ||||
|
| Multiexcerpt | ||||||||||||||||||||||||||
|---|---|---|---|---|---|---|---|---|---|---|---|---|---|---|---|---|---|---|---|---|---|---|---|---|---|---|
| ||||||||||||||||||||||||||
O365 Known Issue and Workarounds for CCERedeploying the CCE
Re-Initializing of the ASMThe ASM must be re-initialized with the image that contains the latest CCE software . To do so: Step
Clean Office 365 tenantIf the CCE was previously deployed, previously installed information must be cleared in O365. To To do so, follow the steps below:
|
Manually Managing the CCE Configuration File
...
The “.ini” file is the configuration of the Microsoft CCE (Cloud Connector Edition) running on the ASM. The contents of the ".ini" file must be as defined by Microsoft. From the Configure CCE panel, the the Raw INI Config drop drop-down list enables you to edit, export, or import the ".ini" file.
...
| Step | Action |
|---|---|
| 1 | After receiving the activity status completion message, click the Click to re-configure CCE application button. |
| 2 | Click OK on the popup. |
| 4 | Click the Raw (INI) Config drop-down list, select Edit. Configurable fields are displayed for editing. Modifications to the CCE configuration requires redeployment of the CCE VM, and this action takes approximately two hours. Note: The example uses AEPSITE2 for the these attributes. |
| 5 | After verifying the information click OK. |
Importing and Exporting the CCE Configuration File
...
Updating the CCE Password
Follow these steps if you if you need to update the O365 tenant admin password or account.
| Step | Action |
|---|---|
| 1 | On the WebUI, run Preparing the CCE to specify a new Password. Select the existing password and enter the new password. Only the O365 should be modified for a running instance of CCE. |
| 2 | On Remote desktop, start the Sonus Cloud Link Deployer, and check Transfer Password from SBC to reset the credentials. |
| Pagebreak |
|---|
Overview
Content Tools